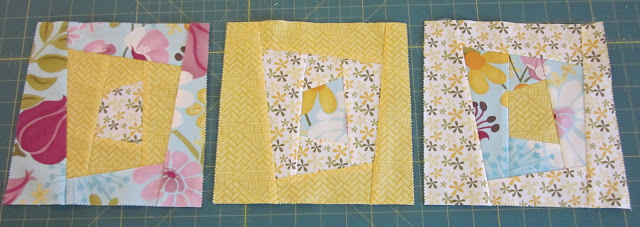
If you are feeling like you want to cut loose and do a few wonky blocks, maybe this will help you to get started. ;-D The number of pieces of fabric you start with in your stack is equal to the number of blocks you will end with after sewing....I'm using 3 fabrics for the tutorial, but I've used up to 6 or 8 at a time for my own quilts. The chain piecing will make the sewing go faster...
You could use this method using any size starter blocks--I used 10" layer cake squares. But you could just as easily use charm squares, or something larger, like fat quarters.
First, stack a few squares on your cutting mat. Try to vary the prints in your stack...these prints will end up next to each other in your blocks. Cut a wonky strip from the right and left sides of your stack. Try not to let the narrower end of the strip go below 1" (usually make my narrow end about 1 1/4" wide...and my larger end about 2" to 2 1/2" wide--but anything goes!). Pull them off to each side, keeping them oriented correctly.
Now, rotate your cutting mat (or your body) and cut a wonky strip from the top and bottom of your stack (which will now be your left and right). Pull them off to the top and bottom, keeping them oriented correctly.
Go back to your original position and cut another wonky strip from the right and left sides of your stack. Pull them off to the sides....
Rotate your cutting mat and cut a wonky strip from the top and bottom of your stack (which will be your left and right again). You should be left with a wonky center piece (an awkward looking quadrilateral). This is just perfect.
Push all of your pieces back into the original stack shape.
Now we are going to shuffle....Leave the outside four strips as they are. Next, take the top strips from the four middle strips and shuffle them to the bottom.
Finally, take top two center pieces and shuffle them to the bottom. You stack of pieces should now look like this....
I place pins into the two horizontal top strips so that during sewing (and ironing) I can remember the proper orientation of the blocks. When I sew, and subsequently iron, I am very careful to note where the pin is to I know where the top of my stack is. You must keep the stack in order or you will end up with some real problems later on when your pieces don't match each other....just guess how I know? LOL....
I chain piece the top and bottom middle pieces to the center piece, using a 1/4" seam....
** Notice that I offset the two pieces by 1/4" so the edges would line up correctly when ironed...**
Now, off to the ironing board--yes, you have to press these before moving on to the next step. I press with the seams going toward the outside of the block, but I doubt it matters. Just be consistent.
Take your block back to the cutting table and trim the sides of the block so they align with the center square. They might not be that far off, depending on your piecing, but you want a straight edge to sew your side pieces onto....
Next, attach the left and right middle sides. Watch the orientation of the blocks....trust me. I've sewed things on upside down and ended up spending the evening with Jack, the Seam Ripper....
Go to the iron an press the seams.
Return to your cutting mat and trim off the excess at the top and bottom. Don't be alarmed about wasting fabric...it is just a bit.
You will now add the top and bottom outside pieces to your wonky blocks. Go to the iron and press again. And back to the cutting board to trim the right and left sides. Don't panic!
Finally, sew on the left and right outside pieces. And go back to the ironing board...and press!
And trim...see that waste? It is the grand total of all the scraps from all three blocks, all the stages of trimming!! Not as much as you might expect....
There you have it...a wonky block. You would now need to square up your blocks to some standard size (maybe 7 1/2" by 7 1/2") and you could assemble your quilt top. Or you could NOT square up the blocks and add some solid strips around the edges of the block and then square up with a wonky solid border going around. I did something similar to this with my Dream On quilt...I added TWO 2 1/2" strips of white to the sides of each block, and ONE 3 1/2" strip to the top of the block...then squared up my blocks to 10 1/2" (finished size of 10"). White border on only three sides of the block....
When I arranged the blocks on my design floor, I made sure that there was a white strip along all of the edges of the quilt (not a colored block part)....and that no two colored parts touched each other. The blocks appeared to be floating around randomly....but each square is really the same size--but a bit wonky! Cool, huh?
Anyhow, I've adapted this with charm squares...only cutting once for the each side and once for the top and bottom. I made little 4 1/2" blocks. You could also just cut perpendicular to the edges of your quilt and get varying width of straighter strips. Very modern and cool. Just do what you want and enjoy it!
*** Note: the more cuts you make from the center to the edge, the more fabric you will have to trim off in each round around. Still, don't be alarmed...it is a nominal amount of waste--and worth the effort for the effect! Have fun!


